Saturday, 23 April 2016

Technical Sessions: Finger Waves

During this session with Lottie we looked at Finger waves. This was something I have always wanted to learn as I think it looks so technical especially used during a contemporary look. I could see this being used in a fashion sense and something I could possible use when creating one of my looks. 

This was something that I found quite hard though, who knew you needed finger muscles eh? Haha! It was definitely a tricky hairstyle for me to try but after I had got it once I knew it was just about applying pressure, not over thinking and practice. 

Product List:
Spray bottle with water 
Pin Tail comb
Paddle brush
Sectioning clips
Hair dryer
Hair Tong
Hairspray 
*PAITENCE*

We were asked to try three different styles, these were the 'S' wave, a normal historically correct finger wave and a finger wave created with a curling tong. 

To create the first type of finger wave which is called the 'S' wave you have to begin by wetting the hair a lot. The wetter the better. I learnt this soon as I wondered why I couldn't quite grasp the look. Lottie's advice was to basically have the hair dripping. You then have to take a section and pinch the fingers in place while brushing the hair to either the left or right (changing each direction as you move down the section). Pushing up as you pinch your fingers each time. Applying sectioning clips, really taking into consideration the direction of the wave. You want to make sure the waves are very prominent. The shorter the hair the better as you really need to be able to use the pressure of the fingers on the head as a help. You can use the help of a hair dryer or hood dryer to help dry this look. 


Overall I did struggle with this look and I know it should definitely be more prominent but for my first go I am proud as I know it is not an easy style to achieve. 


 The second of the looks was the softer finger wave, it was the same technique as the 'S' wave but just softer. Again I know I need to practice this look because it should be more prominent. Here are the pictures. 


The final of the finger waves was the softest of the waves and this was created with heat and not water and gel. Using the heated tongs you first curl a section into smaller sections into barrel curls and pin and cool. Once cooled remove the clips and brush out slightly and manipulate in to position. To clean up any messy ends wrap into a pin curl to finish. 


I feel like this was so helpful to learn as I don't think it is something you can learn unless shown first hand. I am happy with how my results came out and I know if I can practice more I will get it.


Friday, 22 April 2016

Turning my Photo's into a magazine


So I decided to play around with some of my images and create a front cover for an exclusive YSL magazine called Saint. I loved the way this turned out, I came up with the headlines myself and where to place the fonts and captions. I used my favourite image I had taken from this unit not just because it was my favourite but because I think it suits being on a front cover of a magazine. 
My Final Edited Six Images


Editorial Image - Grunge

I'm extremely happy with the way this particular shoot came out. I believe it really channels Yves Saint Laurent as a brand and how they present their editorials. I have taken inspiration from the creative direction of Hedi Slimane and his grungy approach to this seasons SS collection as well as other inspiration from other shoots from other brands, photographers and stylists. I used the current template from the YSL editorials from this season and created this on photoshop. 


Editorial Image - Herb Ritts inspired

This is my favourite image from this entire unit and in fact my favourite picture, idea and concept I have ever had. Ritts work really had an impact on how I came up with this idea as well a few shoots I had seen scattered across the internet. I think this is different to what YSL would do but still has this element of not being put together or too staged. I am so proud of this image, the model Jasmine I believe has the perfect bone structure for this look as well as facial expression.

Advertisement 1

With this advertisement image, I really wanted to take a Cara Delevingne look, as she is one of Yves Saint Laurent and Saint Laurent Paris main model. My model Hannah really fits this role right for me. I love the blonde hair and her eyebrows, they really scream Cara to me and give the YSL beauty vibe. Overall I am very happy with how this shoot came out, this is for my day look. I focused on the lips for my day look as I think stereotypically people would tend to wear brighter colours on their lips rather then on their eyes in the day. 


Advertisement 2 

I'm very proud of my evening look advertisement, as I think I've captured the brand well. I really looked into designing my whole look and concept and how I could recreate the make-up and hair for more of an evening look whilst still following the products that I was attempting to advertise. I added more of a fitted jacket to this look and had my model show more skin, I also added a choker chain style necklace which I think is very YSL and definitely something more that would be worn in an evening look. I prefer the layout of this advertisement compared to my first one (the day look) but I wanted to create something that was similar to the brand with both advertisements. 


Catwalk Image 1 

I really wanted to create a behind the scenes type of catwalk image as I think this was the next best thing after images on a catwalk itself. I wanted to do something that really show of my make-up looks more than anything as Fashion is the type of route I want to take in this industry. I decided to style my first image as the model was getting her make-up and hair finished before shooting, that is why the hair is slicked but not finished and she is styled in a robe. Overall extremely happy with this image.


 Catwalk Image 2

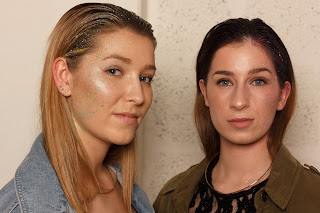
I wanted to make sure I had one image that included two models as this was something I had not done before. (shooting with two models) I wanted to create two different versions of my assessment catwalk look but in different colours. During my design process I featured a comparison between the green and the pink look. I opted for the green look for  my assessment but I didn't want the pink look to go to waste so I decided to incorporate both colour schemes into my catwalk image. I love how this turned out with the highlighted skin which really popped. The paint could have been slightly more prominent but it's not a massively huge issue to me. I like that these catwalk images featured styling which I took inspiration from Saint Laurent's SS 16 collection, the same styling as one of my editorials. I really wanted all of my images to link up including my assessment ones. 

Tuesday, 19 April 2016

Technical Session: Classic Shapes

In this session with Lottie we looked at classic shapes, which included a twist and a slick pony tail. I added a kind of messy pony with a quiff for my own spin on classic shapes. 

Product list:
Paddle Brush
Pin Tail Comb
Hair Bands
Elastics
Bungee Hook bands
Hairspray 
Grips


To begin we had to create a sleek pony tail with a wrap around piece of hair over the band. Creating a sleek pony tail is something that is extremely difficult especially with long hair. Firstly I began by separating the top section of the hair from temple to temple and back to the crown of the head, using slightly damp hair and a backcombing brush begin to bring this back into a smaller pony tail, secure into place. After this take the bottom section and bring it up to meet the first pony tai, secure into place with a bungee hook smoothing as you go. Take a section of the finished pony tail and wrap this around the band, hiding it and secure with a hair pin. Finish with hairspray smoothing any fly aways.


The next look I did was create a pony tail with a bit of a quiff. Firstly I began by taking a top section and back combing to create a quiff, i smoothed out any messy bits and then just repeated the same steps as the first pony tail. 


 The next look I completed was a twist. I kept the quiff from the previous look and instead of creating a ponytail I twisted the small amount of hair remaining. If I was to do this on someone with longer hair I would first pin the hair in one direction for extra security. 

Overall I had never really thought about how hard it can be to actually be to create a sleek pony tail and a much easier way then I had previously been doing. I think this will be a really helpful style to know when working out in industry, especially in fashion. 


Saturday, 16 April 2016

Shoot no.6 Catwalk image 2

This look was my final shoot for this unit, overall  I am very pleased with how it turned out. Considering it was my first shoot with more than one model I love the way it turned out. 
I basically recreated the same look as my assessment but added in another model and recreated the design in a pink tone. I tried some different styling options, some pictures in robes to go in a collection with my catwalk images and some pictures with them in some Saint Laurent inspired clothing from the SS 16 collection by Hedi Slimane. 

I wanted to make this shoot about creating contrast in models, i did this with styling, makeup and hair colour. 


I really wanted to create a very staged behind the scenes but have it still look natural. I wanted to create images you would see in a glossy fashion magazine telling you 'How to get the look'. Personally I think I achieved this! I feel like I have learnt a great deal about my creative ability during this unit and especially when creating images for all three of the categories. 

If i could change something about this shoot I wish I had an extra pair of hands to look like they were having touch up just like my first catwalk but looking I can see it gives them difference and makes hem slightly different but still the same.